
This blog post provides a list of curl commands relevant to importing files into Conscia DX Graph. You can use these notes quickly import data into DX Graph, specifically from CSV files (Comma-Separated Values). For background information, consult Conscia documentation:
- https://docs.conscia.ai/solutions/dx-graph/jobs
- https://docs.conscia.ai/solutions/dx-graph/job-types#import-data-files
- https://docs.conscia.ai/tutorials/loading-data-into-collections#importing-data-files
Choosing an Endpoint
First, choose an API Endpoint, typically one of:
The remainder of this document assumes Conscia staging infrastructure.
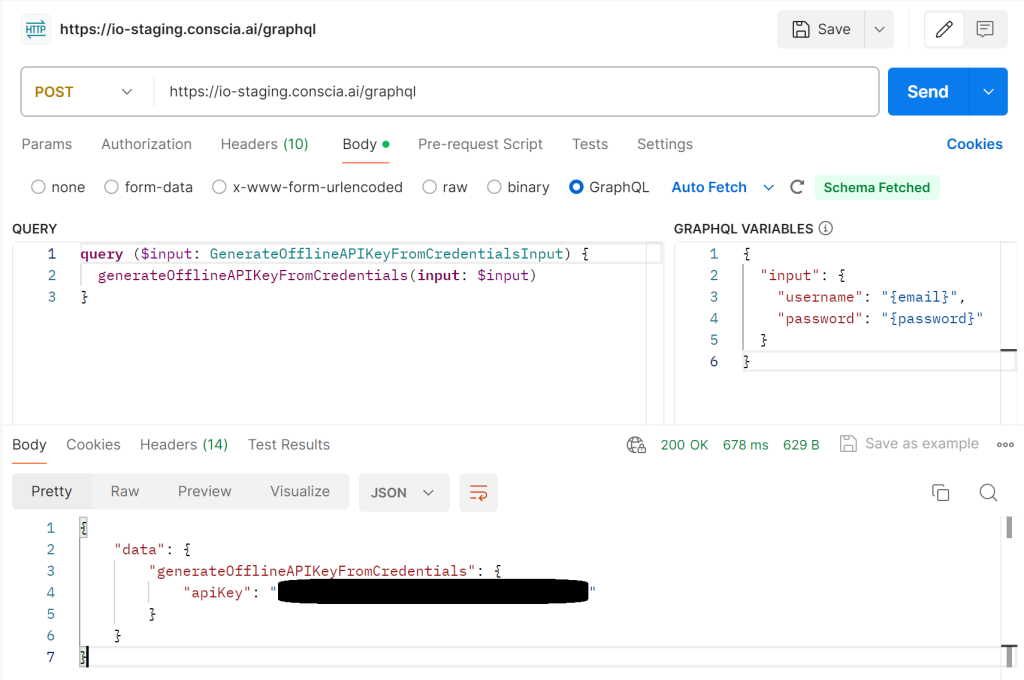
Generating a Token
To generate a token to access DX Graph:
POST https://io-staging.conscia.ai/graphql
Content-Type: application/json
X-Request-Type: GraphQL

query ($input: GenerateOfflineAPIKeyFromCredentialsInput) {
  generateOfflineAPIKeyFromCredentials(input: $input)
}

{
  "input": {
    "username": "{email}",
    "password": "{password}"
  }
}
Remember to avoid recording an actual DX Graph user email address or password anywhere. Using https://www.postman.com:
Preparing Files
Often, you can save spreadsheets as CSV files that you can import into DX Graph Collections.
For CSV files in unknown formats, open the file in a text editor. If the file uses semicolons or another delimiter rather than comma, add sep=; (or equivalent) as the first line in the file. Close the text editor and open the file in Microsoft Excel, and then save it as CSV. Alternatively, specify the alternate delimiter when importing Records from the file.
If there is no column in the spreadsheet that provides a unique identifier for each row, then create one. For example, insert column A, set the value of cell A1 to ID, set the value of cell A2 to 1, set the value of cell A3 to =a2+1, and drag the bottom right corner of cell A3 to the last row of data in the sheet.
Working with Buckets
Before we can import the data in a file, we need to upload it.
Before we can upload files, we need to create one or more Buckets:
To Delete a Bucket
curl --request DELETE --url 'https://io-staging.conscia.ai/vue/_api/v1/buckets/{bucket-code}' -H 'Authorization: Bearer {token}' -H 'X-Customer-Code: {customer-code}'
To Create a Bucket
curl --request PUT --url 'https://io-staging.conscia.ai/vue/_api/v1/buckets/{bucket-code}' -H 'Authorization: Bearer {token}' -H 'X-Customer-Code: {customer-code}' -H 'Content-Type: application/json'-d '{"dataBucketEntry": {"name": "{bucket-name}" }}'
To Upload a file into a Bucket
curl --request PUT --url 'https://io-staging.conscia.ai/vue/_api/v1/buckets/{bucket-code}/upload' -H 'Authorization: Bearer {token}' -H 'X-Customer-Code: {customer-code}' --form 'file[]=@{filename}'
Working with Collections
Before we can import the Records in a file, we need to create a Collection.
To Delete a Collection
curl --request DELETE --url 'https://io-staging.conscia.ai/vue/_api/v1/collections/{collection-code}' -H 'Authorization: Bearer {token}' -H 'X-Customer-Code: {customer-code}'
To Create a Collection
curl --request POST --url 'https://io-staging.conscia.ai/vue/_api/v1/collections' -H 'Authorization: Bearer {token}' -H 'X-Customer-Code: {customer-code}' -H 'Content-Type: application/json' -d '{"collectionCode": "{collection-code}", "name": "{collection-name}", "description": "{collection-description}", "dataRecordIdentifierProperty": "{key-field}"}'
I found that description may be required. dataRecordIdentifierProperty is the name of a Field in the Collection that provides a unique identifier for each Record, which is ID if you created the ID column in the spreadsheet as described previously.
To Define a Schema for a Collection
Before importing, we can define a Schema for the Collection.
curl --request POST --url 'https://io-staging.conscia.ai/vue/_api/v1/collections/{collection-code}/schema' -H 'Authorization: Bearer {token}' -H 'X-Customer-Code: {customer-code}' -H 'Content-Type: application/json' -d '{
  "fields": {
//TODO: additional fields
        "{key-field}": {
          "jsonSchema": { "type": "number" } // or string
        }
      }
}'
To Import the Records from a File into a Collection
Now we can import the Records from the file into the Collection.
curl --request POST --url 'https://io-staging.conscia.ai/vue/_api/v1/buckets/{bucket-code}/files/_import' -H 'Authorization: Bearer {token}' -H 'X-Customer-Code: {customer-code}' -H 'Content-Type: application/json' -d '{"skippedBucketCode": "{skipped-bucket-code}", "processedBucketCode": "{processedBucketCode}", "invalidBucketCode": "{invalid-bucket-code}", "filenamePattern": "{filename}", "skipInvalidRecords": false, "recordIdentifierField": "id", "collectionCode": "{collection-code}","parseOptions": {"format": "DELIMITED","delimiter": ",","quoteChar": "\"","escapeChar": "\"" }}'
To Define DX Graph Navigation
If we haven’t already or if we want to override it, we can add the Collection to the DX Graph UI navigation.
curl --request PUT --url 'https://io-staging.conscia.ai/vue/_api/v1/applications/dx-graph/pages/source/_configureLeftNav' -H 'Authorization: Bearer {token}' -H 'X-Customer-Code: {customer-code}' -H 'Content-Type: application/json' -d '{
  "navigationConfiguration": [
    {
      "title": "{title}",
      "ordinal": 1,
      "active": true,
      "actions": [
//TODO: additional collections
        {
          "label": "{label}",
          "dataRepositoryCode": "content-master",
          "dataCollectionCode": "{collection-code}"
        }
      ]
    }
  ]
}'
To update navigation for the Master page, change /source/ to /master/ in the Webservice URL:
https://io-staging.conscia.ai/vue/_api/v1/applications/dx-graph/pages/master/_configureLeftNav

One thought on “cURL Commands for Importing Files into Conscia DX Graph”